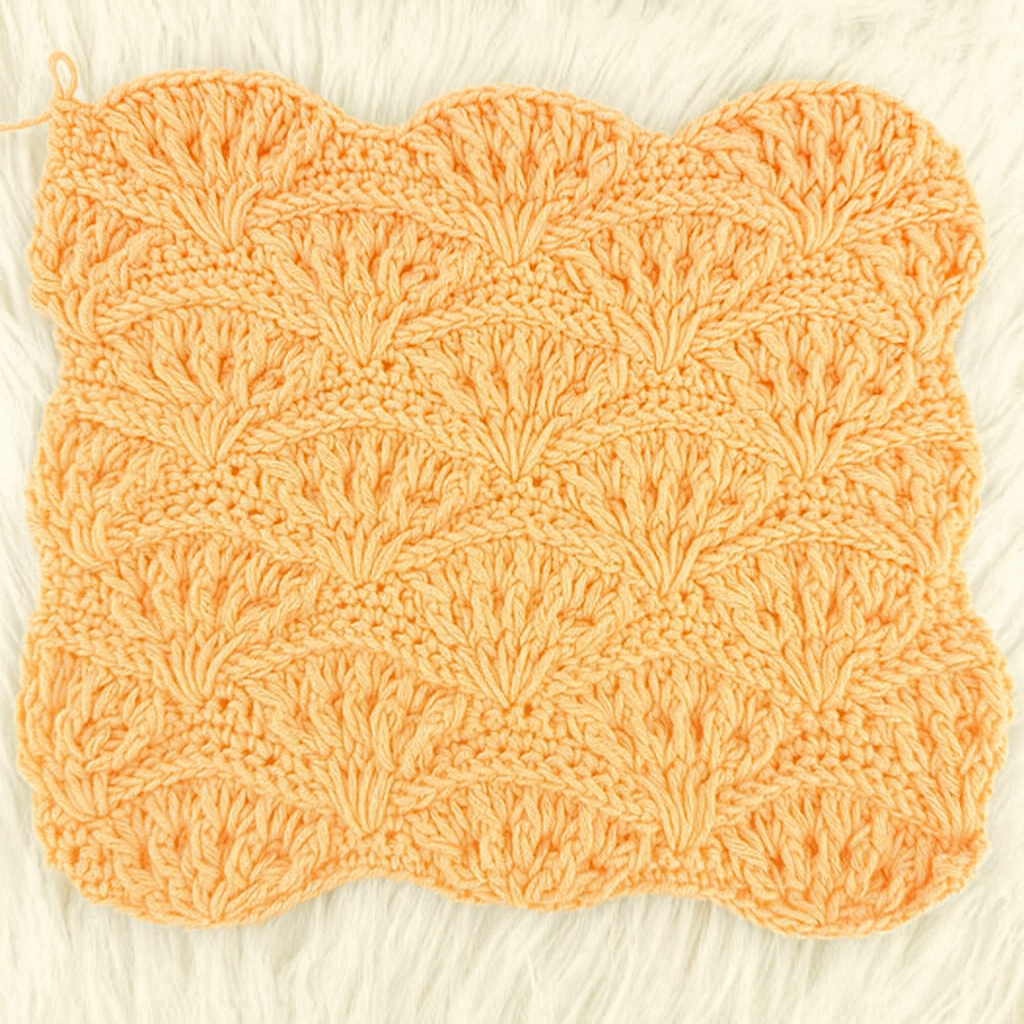
Crochet shell stitch patterns are timeless, versatile, and perfect for creating projects that stand out with elegance. Whether you are making a baby blanket, a cozy throw, or adding decorative edges to garments, the shell stitch offers a beautiful, wavy texture that looks complex but is surprisingly easy once you master the repeats.
In this tutorial, we’ll guide you through the Crochet Shell Pattern step by step. Even if you’re a beginner with some basic knowledge of stitches, you’ll find this stitch fun to practice and rewarding to use in your projects. The instructions below include all abbreviations and detailed rows to help you follow along confidently.
✨ Why Choose the Shell Stitch?
-
It creates a scalloped, textured design that adds movement to your fabric.
-
The stitch is versatile – you can work it in one solid color for a classic look or in multiple shades for a more vibrant style.
-
Perfect for blankets, scarves, cardigans, baby clothes, and decorative borders.
-
Easy to adjust: simply follow the multiple stitch count to make your project larger or smaller.
🧶 Materials You’ll Need
-
Yarn of your choice (medium-weight yarn is great for practice)
-
Crochet hook that matches your yarn size (usually 4.0 mm – 5.5 mm for worsted weight)
-
Scissors
-
Tapestry needle (for weaving in ends)
🔤 Abbreviations
-
beg: beginning
-
bpdc: back post double crochet
-
ch(s): chain(s)
-
dc: double crochet
-
FO: fasten off
-
fpdc: front post double crochet
-
fpsc: front post single crochet
-
rep: repeat
-
Shell: 5 dc in the same stitch
-
Half shell: 3 dc in the same stitch
-
sk: skip
-
sp: space
-
st(s): stitch(es)
-
*: repeat the group of instructions after the asterisk as many times as directed
-
{ }: repeat the group of instructions in brackets as many times as directed

📏 Foundation
To begin, chain 44 for the swatch or use any other multiple of 14 + 2 to customize the width.
🧵 Crochet Shell Pattern – Written Instructions
Row 1
-
SC in the 2nd chain from the hook and in the next 3 chains.
-
*Sk 3 chains, work 5 DC into the next chain, sk 3 chains.
-
SC into the next 7 chains.*
-
Rep until 11 chains remain.
-
To finish: sk 3 chains, 5 DC in next chain, sk 3 chains, SC in the last 4 chains.
-
Ch 1, turn.
Row 2
-
SC in next 3 sts, sk 1 SC.
-
{*BPDC in the next DC, DC into the space between the DC sts (not on top). Rep from * 3 more times.
-
BPDC in the next DC, sk 1 SC, SC in next 5 sts.*}
-
Rep until 4 SC remain, sk 1 SC, SC in next 3 sts.
-
Ch 1, turn.
Row 3
-
SC in next 2 sts, sk 1 SC.
-
{*FPDC in the next DC, [DC into space between DC sts] twice. Rep from * 3 more times.
-
FPDC in next DC, sk 1 SC, SC in next 3 sts.*}
-
Rep until 3 SC remain, sk 1 SC, SC in last 2 sts.
-
Ch 1, turn.
Row 4
-
SC in the first st.
-
FPSC in next 13 sts, sk 1 st, SC in next st.
-
Rep from * until 2 sts remain, sk 1 st, SC in last st.
-
Ch 3, turn.
Row 5
-
3 DC in the first post DC two rows below.
-
Sk 2 SC, SC in next 7 sts. Sk 3 SC, 5 DC in the next SC two rows below.
-
Rep until 4 sts remain, sk 3 SC, 3 DC in the next post DC two rows below, DC in last st.
-
Ch 3, turn.
Row 6
-
BPDC in the next DC, DC into space between DC sts. Rep once more, BPDC in next DC.
-
Sk 1 SC, SC in next 5 sts, sk 1 SC.
-
{BPDC in next DC, DC into space. Rep 3 more times, BPDC in next DC, sk 1 SC, SC in next 5 sts.}
-
Rep until 4 sts remain.
-
BPDC in next DC, DC into space. Rep once, BPDC in next DC, DC in last st.
-
Ch 3, turn.
Row 7
-
FPDC in next DC, [DC into space between DC sts] twice. Rep once more, FPDC in next DC.
-
{Sk 1 SC, SC in next 3 sts. FPDC in next DC, [DC in space] twice. Rep 3 more times, FPDC in next DC.}
-
Rep until 11 sts remain, sk 1 st, SC in next 3 sts, sk 1 st, FPDC in next DC.
Row 8
-
SC in first st, sk 1 st, FPSC in next 6 sts.
-
Sk 1 st, SC in next st.
-
FPSC in next 13 sts, sk 1 st, SC in next st.
-
Rep until 9 sts remain, sk 1 st, FPSC in 6 sts, sk 1 st, SC in last st.
-
Ch 1, turn.
Row 9
-
SC in next 4 sts.
-
Sk 3 sts, 5 DC in the next SC two rows below, sk 3 sts, SC in next 7 sts.
-
Rep until 11 sts remain, sk 3 sts, 5 DC in next SC two rows below, sk 3 sts, SC in last 4 sts.
-
Ch 1, turn.
🌈 Tips for Using the Shell Stitch
-
For a baby blanket, try soft pastel shades for a delicate look.
-
For a modern throw, alternate two contrasting colors every 2–3 rows.
-
This stitch also makes a beautiful scarf or wrap when worked in lightweight yarn.

🎀 Conclusion
The Crochet Shell Pattern is a must-learn stitch for any crocheter. Its delicate curves and structured design bring a sense of elegance to every project, while the repeats make it easy to memorize as you go along. Whether you’re a beginner looking for a challenge or an experienced crocheter exploring new textures, this stitch will quickly become one of your favorites.
👉 Save this tutorial, try it with your favorite yarn, and share your creations with fellow crocheters. With a little practice, you’ll be able to adapt this stitch into countless projects, from blankets to fashion accessories!